Sider

Viser innlegg med etiketten Sewaholic. Vis alle innlegg

mandag 1. februar 2016

My Davies

When Sewaholic released the Davie dress, I had to get it.
What's not to love - princess seams, a flared skirt, made for knits
I've made two Davie dresses so far, and I love them both.

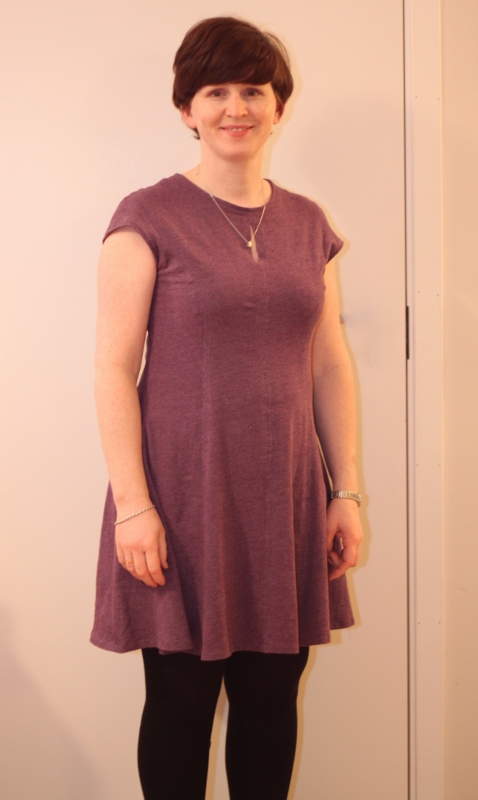
My first one is made as view B in a french terry from Mood fabrics. It's a lovely purple colour, and the fabric is nice and soft. It's a lot thinner than other french terrys I've had, but it works very well with this dress.
I made the dress straight from the pattern, and it kind of fit, but not quite. I'm short, so dresses with no waist seam are bound not to fit me properly. I fixed it by raising the shoulders by 1,5 cm, it made the waist hit better. I also made some alterations to the back seams so compensate for my sway back.

After using the dress for a while, I was not happy with the sleeve openings. They were very low and showed off whatever I was wearing underneath, and I decided I had to do something about it to be able to wear the dress without a cardigan. I ended up raising the shoulders by another 2,5 cm. This meant I had to undo the neck binding and re-do that.
Now I am more comfortable with the sleeve openings, but I'm not sure I'll be comfortable wearing the dress without tights, as it's a bit on the short side for my liking (which is a bit annoying, as I had plenty of fabric to make it longer to start with).

The colour is somewhere between the two below.


The next dress was made with some changes. Firstly I made it longer, using the pattern pieces from view A. Also I wanted a dress more appropriate for winter. Sewaholic had suggested to add sleeves by using the Renfrew pattern, so I set to work on altering the pattern. It was a bit of a challenge, since the dress had princess seams that ended up in the sleeve openings, but after a lot of thinking, measuring, drawing and redrawing, I had the changes I needed to make a Davie dress with sleeves.

The blue fabric is a different french terry, from Stoff og stil. It's quite different to the french terry from Moods, stiffer, I guess. They both have loops on the inside.
I had just enough fabric to sqeeze out a view A, as it's a bit longer than view B. I had to make the right sleeve from two pieces, but the seam down the middle is pretty much invisible.

I started cutting the fabric on the last day of 2015, and it was the first make I finished in the new year. It turned out just like I hoped, perhaps even a little better.
When it was all sewn up, the long length and high neckline made it suitable for an Amish dress, according to my husband. I took some cms off the length and cut a wider neck which I bound with bias binding as per Sewaholics instructions. I am very happy with the final result.


I think the Davie dress is a lovely dress, another hit by Sewaholic. My only issue with it is the wide sleeve openings, but that's not too hard to fix once one is aware of it. The nice fit bodice with the flare skirt is a great combination.

søndag 20. desember 2015

Robson coat - a proper trench coat

I can't believe I've made myself a trench coat! I am very proud of it, so be warned - this post contains a lot of photos!!

This project has taken a while. Firstly to get all the bits together, than to sew it, and lastly to photograph and blog it.
Since I mostly wear dresses, I thought I needed a coat. As much as I love my Minuro jacket, I prefer having a longer coat to wear over dresses, and I decided on the Robson coat, also from Sewaholic.
I had decided on a fabric that I used to make a pair of pants for my eldest son, a gray cotton twill. I had also decided that I needed a lined coat, as this part of the world is always windy, and I'd found a matching cotton satteen for the lining. 
Only trouble was the shop didn't have the twill anymore...
Lining fabric

So I looked all over the Norwegian online shops I could find, and no-one had anything resembling the fabric I was after, mostly stretch knit fabrics, totally useless for a coat anyway.
As luck would have it, my parents were going to the US, and that gave me a good chance to order some fabrics online over there and have them bring it back for me. Saved me a lot on postage and import duty. I ordered a charcoal twill from Mood fabrics, and although it turned out looking a bit different to what I thought, I really like it!
Twill
Finally, I was set to go. 
I'd drafted a pattern for the lining, based on the tutorial given by Sewaholic on Tilly and the buttons's blog. I found it very appropriate as I was sewing a Sewaholic design. The tutorial was easy to follow, so drafting the lining wasn't too hard, just a bit of work. For the sleeve lining I'd ordered a polyester charmeuse from Mood fabrics, as I thought the silk charmeuse I'd read about on Lladybirds blog was too pricey for my 0 salary at the time.
Sleeve lining - right and wrong sides

Based on my previous Sewaholic makes, I cut a size 8. The only change I made was to shorten the coat in all the places indicated on the pattern (above the waist and on the sleeves). Lots and lots of parts, big and small, and I also had a hard time telling the right side from the wrong side of my main fabric. I got the hang of it after a while though.

Once the fabric was cut, I got sewing. Sewaholics instructions are always clear and easy to follow, the only trouble I had was when it came to setting in the sleeves - I found that not all the notches on the sleeves and coat matched. I did my best, and they look and feel right.
Since the pattern is made for an unlined coat, I used the instructions from the Minuro coat for making and attaching the lining. I had some trouble at the bottom of the coat front, since I hadn't accounted for attatching a lining when cutting out the patterns pieces here, but I got around it somehow, and it looks OK.

Originally the need for this coat arised from me wanting a light coat to wear over dresses on those not so summery days. It's turned out to be quite a warm coat, very suitable for fall/ autumn as well, because the twill fabric is heavier than the one I first had my eyes set on, and beause it it lined. 
All in all, I'm very pleased with the coat, and so impressed that I've made it myself!

The only change I need to make for next time, and which I am kicking myself for not making this time, is to give myself some more room in the princess seams in the front, since I'm not your average B-cup. I know I thought about the princess seams being a good place to add some space, but after completing the coat and only having the buttons left, I noticed I hadn't. So I moved the top buttons a little to add a little room, but there is quite a lot of pulling and some restraint on my arm movement when I close them. 

I've used thread from my usual dealer - regular charcoal sewing thread for all the seems, and Guterman top stitching thread for all the top stitching. 

Lining completed

Attaching lining to main fabric at bottom corner - a bit of difference in the length there...

Lining and facing - great fabric match I must say

Getting there!

Sewing the sleeves to the sleeve lining

Sleeve and lining attached
Comleted! 


Sleeve tabs and some serious top stiching


onsdag 31. desember 2014

Julegave til mamma

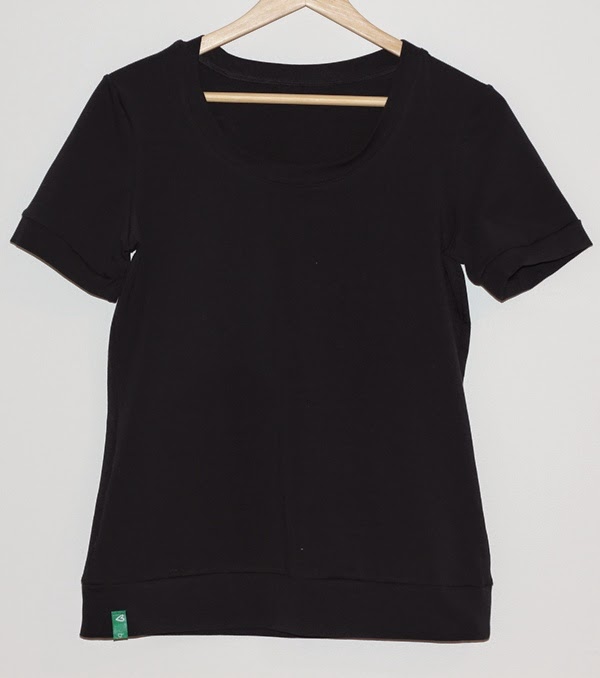
I år har jeg sydd julegave til mamma også. Hun ønsket seg en svart topp, og jeg er veldig begeistret for Renfrew-toppen fra Sewaholic.
Jerseyen er fra Textart og jeg har sydd toppen i str 8.

Halskanten i mønsteret var for lang, så den kortet jeg inn med omtrent 3 cm for at den skulle passe til halsrigningen. Det er også sydd på kanter rundt ermene og nederst.
En veldig enkel topp, men samtidig er det litt med den, i og med disse kantene og at den er innsvingt.


mandag 9. juni 2014

Lunsj i det grønne

Jeg er glad i grønt. I følge guttene mine elsker jeg grønt.
Så dette stoffet måtte jeg bare ha da jeg så det hos Kreativ for lenge siden.
Siden har det ligget i skapet i påvente av det ""perfekte" kjolemønsteret.

Etter å ha sydd en del kjoler, og vridd hjernen min for å finne ut hvordan den grønne kjolen skulle se ut, gikk jeg i gang med å lage min egen kjole. Ikke helt fra bunnen riktignok, men litt hjemmemekka likevel.

Til overstykke har jeg brukt mønsteret til Sewaholic's "Renfrew"-topp, som jeg har sydd to størrelser mindre  (altså str 4) enn genseren min her.
Jeg la til noen cm i utrigningen for å slippe å kante den, men samtidig være anstendig. Her har jeg sydd på belegg i stedet som jeg så har sydd fast i sømmonnet. Jeg ønsker ingen søm rundt halsåpningen, så jeg håper belegget vil ligge som det skal.
Selvom jeg tok ut en kile i ryggen på overdelen, var den fortsatt lengre bak en framme da jeg hadde sydd den sammen. Kort rygg, altså!

Skjørtet er et 1/4-sirkelskjørt, rett og slett en kvart sirkel som er sydd sammen til et skjørt. Jeg har brukt kalkulatoren til By hand London for å få målene til skjørtet. Jeg var veldig usikker på om jeg skulle bruke en halv eller en kvart sirkel, og begge deler hadde nok blitt fint.
Jeg har ikke brukt noe stabilisering i sømmen i livet, men ser for meg at jeg kanskje burde/ bør etterhvert. Sømmen treffer litt uheldig på min kroppsfasong, men det er rette høyden, så jeg får jobbe litt med fasongen i stedet.

Jeg er godt fornøyd med kjolen, og håper å få brukt den masse.
Og jeg har fortsatt grønn viskosejersey igjen :) Den er ganske tynn, men skikkelig tung og faller fint.

Det var vanskelig å få gode bilder av kjolen, men fargen er kjempefin.


søndag 16. mars 2014

Sydd ullgenser i Janus-ull (My woolly Renfrew)

Det går fortere å sy enn å strikke, så da jeg ønsket meg en ny ullgenser til vinterferien på fjellet, fant jeg fram dette fine ullstoffet fra Janus.
Det er litt tykkere enn det de bruker i ullundertøyet sitt, og er likt på begge sider.
Mønsteret til Renfrew-genseren fra Sewaholic hadde jeg hatt liggende en stund, så det var på tide å få brukt det.
En veldig enkel genser å sy, men med linning og mansjetter, i tillegg til kragen, er den flottere å se til enn en vanlig t-skjorte. Jeg tok meg ikke tid til å lese veilednigen skikkelig, så jeg klippet i utgangspunktet bare en del til kragen, og da jeg fant ut det skulle være to, hadde jeg bare stoff nok til å klippe den på tvers av trådretningen. I og med at den ene siden er riktig vei, tror jeg det skal gå helt fint - den vil ikke få mulighet til å strekke seg altfor mye.
Genseren er klippet og sydd i str 8, med justeringer for petite, siden jeg er så kort, og den passer veldig fint. Det kan hende jeg vil lage neste variant litt mer innsvingt i livet, for jeg kommer til å bruke dette mønsteret igjen, gjerne i flere varianter. Det er så kjekt med mønster som kan varieres så mye som dette - tre ermelengder og tre halsvarianter. Denne er sydd med ermevariant A og krage C.

Genseren ble god og varm, og ullen fra Janus er en fornøyelse å ha på.

Renfrew - bilde lånt fra Sewaholicpatterns.com


onsdag 4. desember 2013

My Minoru

(Since the pattern designer is Canadian, I'll do this post in English. In case she happens to come across it...)

My Minuro jacket is done, as part of a sew-along online. I had the pattern from Sewaholic for a while before I got started, looking around for the perfect fabric for it. When I at last found a fabric I wanted to use, the shop didn't have enough, and they recommended this for me instead. It turned out to be just the right fabric for me and my jacket - light weight, windproof and a lovely brown colour!

Photo from Kreativ (pppp.no)
Last year my mum brought me back some lovely Aboriginal fabrics from Australia, and I'd been trying to come up with a project for some of them. I like them very much, but they were perhaps a bit too much for a dress (which I often end up making). This dark fabric matches very well with the outer fabric of the jacket, so I decided to use it as the lining. I have used regular lining fabric in the sleeves, to prevent my jumper from getting stuck inside the jacket.

I first did a simple muslin/ toile with cheap muslin fabric from IKEA, and I'm glad I did. The muslin was a size 8, and I ended up taking off about 2,5 cms of the length of the jacket and the sleeves, and I added about 1 - 2 cm with because it was a little tight across my shoulders. I took the length off above the waist, as I have a short back (or maybe I'm just short).


So I got gutting and sewing, and it took me most of November to get it done. Not because sewing the Minuro jacket was particularly difficult or anything, the instructions in the booklet and online make it quite easy, but there were just so many operations included in making a jacket! I like to be thorough when doing something I haven't done before, and also I don't have much time set aside for sewing, so the weeks flew by. Also little things like deciding to put in side seam pockets AFTER sewing, overlocking and topstitching the side seams will set you back an hour or two... But I like the pockets! (tutorial here)

Dec 1 was the deadline for entering the voting in the sewalong, and there's nothing like a potential prize to motivate me! I got it done just in time, and posted my photos pretty much on the deadline.

So far I've only got these two photos to show for all my hard work, but I'll try and get some more shortly.
The jacket is a spring/ autumn (fall) jacket, and will be keeping comfortable in the cupboard/ closet during the cold and wet winter.

Looking rather pleased with myself ;)


One other alteration I did was to add another placket behind the zip to make it windproof. I live in western Norway, and there is always wind. If we by chance have a day without wind, we usually don't need a jacket either.


Related Posts Plugin for WordPress, Blogger...